Often when I prepare a recipe I end up making it again right away since it it fresh in my mind (and I've had success) . A few weeks ago I made five batches of lemon bars within a short time span, and now I have made my "Overnight Cinnamon Rolls" twice within the last week; once for Easter brunch, and then a few days later for a staff-meeting-turned-birthday-party potluck at work.
This is one of the few recipes that I will take credit for creating. With that said, somewhere down the line years ago I had to start with someone else's version of a cinnamon roll recipe, but I have, and continue to transform it into what I am sharing today.
When I taught Foods classes in a traditional high school we had 55 minutes to set up, prepare, eat and clean up, which is challenging to say the least. To make this work, many of the recipes were divided into two days, but that took planning and recipe adjustment.
The advanced level of my class ran a "Bakeshop" a couple days a week for a few weeks each semester at which the good-sport teachers could sign up to bring their classes down to our area to buy the food that the culinary students prepared. Next to breakfast burritos, these cinnamon rolls were the biggest hit.
I had to smile when I hunted down this recipe because I had written it very specifically for the lab environment -- it said that the counter needed to be thoroughly clean before kneading the dough, designated the specific bowls to use, and how to wrap and label their rolls so the kitchen groups would get the same pans back the following day. I reworded it, assuming that your counters are clean and that you only have one kitchen. ;-)
 |
| Start out by proofing the yeast with warm water, oil and sugar for 15 minutes. |
 |
| While the yeast is proofing prepare the sugar-cinnamon filling. A food processor makes this easy, but is not required. |
 |
| Pulse all ingredients until the butter is cut into pea-sized pieces. |
 |
| The dough does not need to be kneaded too much -- it should be very soft, but not sticky. |
 |
| Roll the dough out to about 16 x 18" on a clean counter. |
 |
| Spread the filling over the dough, leaving about one inch to pinch at the end. I like a lot of filling. You may not want to use all of it, but I use it as stated in recipe! |
 |
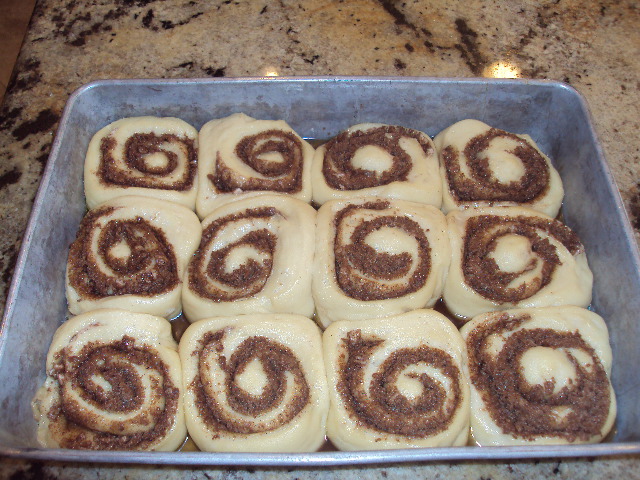
| Cut into 1 1/2" slices. They will grow to fit the pan. Place 12 in a 9 x 12" sprayed pan. Note that I use unflavored dental floss to cut the cleanly without squishing the dough. |
 |
| Allow to sit in fridge overnight. The rising will begin to take place there. Allow to come to room temperature before putting in the oven. |
 |
| Bake until golden brown. Do not underbake! |
 |
| The caramel glaze should be thin enough to pour -- kind of like pancake batter. Frost promptly out of the oven. |
- The water should be about 105 degrees - any hotter could kill the yeast.
- Eggs are best added to baked good recipes when they are at room temperature.
- Add the full five cups of flour, and then more only if needed. Do not use the dough hook to knead the dough. Minimal kneading is necessary. When I had students do this at school they didn't use the Kitchen Aides at all -- everything related to the dough was done by hand.
- As mentioned in a caption, there is a lot of the filling! Use only as much as you want.
- The dough is soft, so the best way to cut the rolls is to shimmy a long piece of unflavored dental floss under the roll and cross the ends above it, which slices right through the roll resulting in clean cut.
- When we did this at school I used evaporated milk for the icing because it was easy to keep on hand. Half and half works great -- my guess is that milk would be fine too.
- The icing ingredient quantities are imprecise because it depends upon your preference as to how thick you want it.
- Even though there are a lot of steps, this is a great recipe, and can be done in a reasonable amount of time. It's worth the effort!
Use the link below to access a printable copy of this recipe.
http://www.scribd.com/doc/134559844/Overnight-Cinnamon-Rolls
As I've mentioned before, we are still learning what our options are for the blog and attaching files. So far, this is the only way I have figured out to do it to allow any reader to be able to print. If anyone has suggestions for me, I'd appreciate hearing from you!
Happy Baking!

This comment has been removed by a blog administrator.
ReplyDeleteIts not my first time to visit this web site, i am browsing this web site
ReplyDeletedailly and obtain nice facts from here daily.
My web page: http://www.youtube.com/watch?v=JoRWJriSgKc